05 August 2013

DataStage Patterns – Calculate Count and Avg with the same Aggregator stage

Requirement: Build a job that calculates an average value for a group of rows and count the rows used in the calculation.

Solution: The DataStage Aggregator stage can either calculate an average value or count records, but not both at the same time. We could easily build a job like this:

image

The first aggregator stage calculates the average and the second calculates the count of rows. The disadvantages are that we need to join the data back together and if the input is not sorted then a Hash aggregation should be forced (each stage will create its own hash table).

But what about if we want to do both calculations using a single aggregator stage? We can do it by introducing a new column (via column generator for example)  with constant value of “1”. Then we can sum this column using the same aggregator. The job will look like this:

image

image

14 July 2013

Getting Started with IBM PureData System for Analytics

PureData System for Analytics is a data appliance offered by IBM and powered by the IBM Netezza technology. It runs on a hardware that is not likely to have at home, but if you want to test how it works, there is a Netezza emulator that runs as a virtual machine under Windows. Here I’m going to summarize the steps to run the emulator on your machine:

  1. Join the Netezza Developer Network (NDN) by sending an email to the group admins using the link on the page. After joining the group you will be able to download the emulator. The group has a wiki page where you can find the login credentials for the emulator and other useful information.
  2. The Netezza emulator runs as a VMware machines. You will need to have VMware Player (free) or VMWare Workstation (paid). The VMware Player requires installing the VIX API – more info can be found in the wiki section of the NDN.
    The emulator can run on VMware vSphere but officially this is not supported and you will need to manually tweak the virtual machines to run there.
  3. Download the windows client software for Netezza:
    • Go to IBM Fix Central
    • Select “Information Management” for a “Product Group”
    • Then select “IBM Netezza NPS Software and Clients”
    • Select the latest version. Currently, this is 7.0.3
    • Select “Linux” as a “Platform”
    • Select “Browse for Fixes” and hit “Continue”
    • Locate the NPS version file in which you can download “nz-winclient-v7.0.3.zip”
    Inside the zip file you will find the Netezza documentation, the JDBC, ODBC and OLE DB drivers and the Administrative Tools.
  4. The windows client software does not provide developer IDE so a third party one should be used. My personal preference goes to Aginity Workbench for Netezza. Can be freely downloaded and after period of time you are required to do a free registration to continue using it – no payment is required.

05 July 2013

DataStage Anti-Patterns–Aggregator and Lookup

Today I would like to start a new series of posts dedicated to some patterns and anti-patterns commonly found in a DataStage jobs.

Requirement: Build a job that reads invoice items (each invoice has multiple items) and needs to calculate the average invoice item sale price for each invoice. The newly calculated value should be added as a new column.

Solution 1 (not recommended): The straight-forward way to implement the requirement above is to use a copy stage to split the data followed by sort and aggregator stages to calculate the average sale price. Then use a lookup to put the newly calculated value back to the invoice item. The job design looks as follow:

image

But what is the downside with this? Since the input before the cp stage is not sorted we need to use the Entire partitioning for the lookup stage – this requires repartitioning and puts even more pressure to the memory for the lookup stage. A simple work-around would be to move the sort stage before the copy stage. The job design the will look like this:

image

But what seems to be the problem with this design? It’s not obvious but this design puts also pressure to the memory and delays the processing – the lookup stage does not output data unless all the records from the reference link are available. In other words – the above lookup will start matching records only when the aggregator stage has calculated all the input records. To overcome this we can design the job by replacing the lookup stage with a join stage.

Solution 2 (recommended):

By replacing the lookup stage with a join stage we solve the problems with the previous designs: the records are joined as soon as they are outputted from the aggregator stage. The job design looks like this:

image

08 June 2013

How to setup the DataStage environment to work with the shell

In the past few weeks I had to frequently work on servers where the DataStage environment was not setup to work with the shell. So as a result of this, if you try to run the dsjob command you will get something like this:

$ dsjob
dsjob: error while loading shared libraries: libvmdsapi.so: cannot open shared object file: No such file or directory

Presuming that you have selected the default path names during the installation of your server, the following will setup the environment:


$ export DSHOME=/opt/IBM/InformationServer/Server/DSEngine
$ export PATH=$PATH:$DSHOME/bin:/opt/IBM/InformationServer/Server/PXEngine/bin
$ export APT_CONFIG_FILE=/opt/IBM/InformationServer/Server/Configurations/default.apt
$ . /$DSHOME/dsenv

You could even include the above into the  ~/.bashrc file so they are executed automatically.

How to setup CentOS to work with external DHCP

Last week I had to setup a CentOS 5.5 machine that relied on external DHCP for IP configuration. The default network configuration was:

[root@nhsrv1 /]# cat /etc/sysconfig/network-scripts/ifcfg-eth0
# Intel Corporation 82545EM Gigabit Ethernet Controller (Copper)
DEVICE=eth0
BOOTPROTO=dhcp
HWADDR=(mac omitted)
ONBOOT=yes
TYPE=Ethernet

Unfortunately the other machines in the network were not able to ping it over host name, but only by IP address. After quick investigation, the solution was found – the last line had to be added to the ifcfg-eth0:

[root@nhsrv1 /]# cat /etc/sysconfig/network-scripts/ifcfg-eth0
# Intel Corporation 82545EM Gigabit Ethernet Controller (Copper)
DEVICE=eth0
BOOTPROTO=dhcp
HWADDR=(mac omitted)
ONBOOT=yes
TYPE=Ethernet
DHCP_HOSTNAME=nhsrv1
and then restart the configuration:

[root@nhsrv1 /]# /etc/init.d/network restart

Apparently some DHCP servers require the client to specify a hostname before receiving an IP address. And here is the official CentOS page about DHCP_HOSTNAME.

The above is also valid for CentOS 6.

24 November 2012

Exporting/Importing Microsoft Outlook 2010 Email Account

Microsoft Outlook 2010 is pretty sophisticated application but unfortunately just recently I was hit by a major imperfection – there is no way to import/export your email account settings (IMAP/POP3 configuration, etc.). Nevertheless there is one tricky way to do it – import/export some Windows registry keys. To export the account settings just export the following key:

HKEY_CURRENT_USER\Software\Microsoft\Windows NT\CurrentVersion\Windows Messaging Subsystem\Profiles\Outlook

To do so just run regedit.exe and navigate to the key above, right click on it and select Export.

The import process will be to simply double click on the exported file.

30 August 2012

Getting Started with IBM Netezza

Note: More recent version covering Netezza 7 is available here: http://szahariev.blogspot.com/2013/07/getting-started-with-ibm-puredata.html

Data Warehouse, Business Intelligence, ETL, Data Analysis are terms we here more and more every day. But there is one name that becomes more and more popular: Netezza – state of the art data warehouse appliance offered by IBM. If you want to get started with Netezza, there is a good news: IBM distributes an emulator running under Windows that you can download and deploy at home. So here is what you need:

  1. Download and install VMware player (free) or VMware workstation (paid)
  2. Install VIX API (free) if using VMware player
  3. Download the Netezza emulator by first requesting to join the IBM Netezza Developer Network (NDN) by following this link: https://www.ibm.com/developerworks/mydeveloperworks/groups/service/html/communityview?communityUuid=35ac05e2-4e00-42fe-b252-111e5f3ad8fa

When you join the IBM NDN you will find there not only the emulator but also the required product documentation that will guide you to master the product. Here is what you will get when the emulator is running:

image

Currently IBM does not offer Windows based GUI for querying the Netezza so you will have to connect to the Netezza host and use nzsql by using ssh client.

One 3rd party alternative to the nzsql is the Aginity Workbench for Netezza. It runs under Windows and provides GUI for querying the Netezza. The application will require a free registration after a 10 days trial period. The downside is that you will need a Netezza ODBC or OLE DB driver to connect to the Netezza host. Unfortunately these drivers can be downloaded only by IBM customers.

29 August 2012

Using Notepad++ to Search and Replace using Regular Expressions

Not long time ago I had to modify a 300 lines SQL Server stored procedure that uses columns containing spaces in the names into a version that does not contain spaces. For example columns like [Price Rate] should be converted to Price_Rate. Doing this manually is long and tedious task. Fortunately Notepad++ saved the day once again – use regular expressions.

To to search and replace the spaces for the column names with underscore open the Notepad++ Replace dialog (Ctrl+H) and type the following for the search pattern:

\[([0-9a-zA-Z]*) ([0-9a-zA-Z]*)\]

The above will match everything that starts with [ continues with combination of letters or numbers, has a space after that, has a combination of letter or number after the space and ends with ]

Type the following for the “Replace with” field:

\1_\2

This means that Notepad++ will replace the \1 with the match between the [ and the space from the column name. The \2 will be replaced with the match between the space and the ]. Here we are using one special feature – if part of regular expression is within a round brackets then this match can be tagged using \1, \2, \3, etc.

At the end select “Regular expression” for “Search Mode” and hit the “Replace All” button.

image

For more information about the special character of a regular expressions take a look here.

12 February 2012

Introduction to DSCop

DSCop is an open source tool that analyzes IBM InfoSphere DataStage jobs and reports information such as violation of some commonly accepted best practices. It's developed in C# and provides plugin based architecture to allow 3rd party extensibility. The tool comes with a few sample plugins that should be enough for basic understanding how the tool works and how to implement your own plugins.

Requirements

Computer running version of Microsoft Windows with .NET Framework 4 preinstalled.

Download and Install

The current publicly available version of DSCop is RC1 available here. After download unzip the file and you are ready to use the tool.

Basic Usage Scenario

The tool will automatically search the folder where the DSCop.exe file is located and will load all the plugins. Each plugin contains one or more rules. Each rule enforces certain check that is performed on  a DataStage job. The jobs should be exported to one or many xml files.

To check a job with the tool, use this syntax:

DSCop jobfilename.xml

As a result you will get a list with rules that were executed, jobs processed, rule violations found.

A sample output after running the tool is shown here:

image

DataStage has the ability to export multiple jobs into singe XML file. However if your jobs are not in one file you can use wildcards to specify them like this:

DSCop Staging*.xml

Advanced Usage Scenario

Now we are going to explore some of the advanced use cases where you want to run the tool by including/excluding certain rules.

The syntax for running the tool by explicitly enumerating the rules you want to execute is:

DSCop jobfile.xml –include RuleName1 RuleName2 RuleName3

A sample output using this syntax is shown bellow:

image

Please notice the “*Ignore” next to the rules that are not enforced.

To exclude certain rules use the following syntax:

DSCop jobfile.xml –exclude RileName1, RuleName2, RuleName3

image

Sample Plugins

The RC1 version of the tool comes with the following plugins/rules:

  • CoreRules/StableSortRule – checks all Sort stages whether the StableSort=true. StableSort is enabled by default but should not be used due to decreased performance.
  • CoreRules/TeradataConnectorParametersRule – checks all Teradata connector stages whether the ServerName/Username/Password properties are parameterized. Hardcoding this information should be avoided.
  • NamingRules/PrefixNamingRule – checks if stage names are following predefined naming convention. The naming convention is described in a the file NamingPrefixes.xml located in the same folder as the plugin.

Feedback

You can send your feedback to the following email: dscoptool-at-gmail.com

10 February 2012

Some tips for the SSD owners running Windows

Solid State Drives (SSD) are much different than Hard Disk Drives (HDD). Because of this you must change your usual pattern of usage. Otherwise you risk your shiny new SSD to be at the end of its life only after a few months of use. In this post I will describe some of the tricks that seems to work on my machine.

The main disadvantage of the SSD devices is that each data cell can be re-written limited number of times. This number is several times lower than the data cell in the HDD. So you must make sure that the applications you are using are not constantly writing on the SSD. Bellow is a short list that will extend the life of your SSD.

Must Have


Disable Windows Swap File

If Windows runs out of RAM then it moves some of the data to the swap file on your disk drive. This is one of the primary sources of disk write operations on systems running with low RAM memory. Buy more RAM and disable Windows swap file. The RAM you need depends on the applications you are running and the version of Windows. IMHO for Windows 7 you need at least 4GB RAM, 8GB is recommended.

Turn off Disk Defragmenter Schedule

The classic hard disk drives are using a moving head that reads the data from the disk. If the file is not located on sequential blocks on the disk, the head positioning time will increase and this will slow down the read process. The defragmentation process makes sure that the file blocks are located in a sequence on the disk. The SSD do not suffer from this since there is no head that reads the information. So you don’t need this feature.

If you perform defragmentation on SSD drive this will only drain write cycles from its life.

Windows 7 automatically detects SSD drives and turns of the defragmentation but it does not hurt to check if it has been stopped. On Windows 7 you can disable the Disk Defragmenter Schedule like this.

Move Temp Folders to RAM Drive

RAM drive is a disk drive that looks looks like a normal drive for your windows but stores the information in the RAM instead of using a SSD or HDD. The operations with RAM drive are several times faster than the operations with SSD or HDD. The downside is that you lose the drive content after powering off your computer. But the Temp folder is used by Windows to store temporary files not needed after power off. So you don’t have to worry that you will lose something important.

Moving the windows Temp folder to a RAM drive will decrease the write operations on your SSD and this prolongs its life. Here is how to move the Windows Temp folder to another location. The only think you should select is the software that emulates your RAM drive since Windows still does not have such a feature. For example the QSoft’s RAMDisk does a perfect job for me. You can download a free version that will expire after 6 months (at which point you need to download new free version which will be active for another 6 months).

You can even move the location of Internet Temp folder but this will slow down your browsing since there will be no cached images or pages and everything will be downloaded again after you power off the PC.

Turn off Windows Search

Windows Search is another feature that generates a lot of write operations due to the indexing process. The SSD are quite fast on reading data so you don’t need indexes to speed up your search. You can turn it off like this on Windows 7 systems. Of course if you are not satisfied you can always turn it on.

Monitor the Overall Health of the Drive

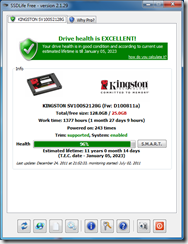
Install an application that will report your drive health. For example a good choice is the free version of SSDLife. It can be downloaded here. The most useful metric is the approximate date when the drive is supposed to failure.
image


Nice To Have


Hibernation

Hibernation becomes very tempting when combined with fast disk drive. The down side is that this feature stores GB of information (depending on you RAM size) every time when the system is hibernated. Having in mind that the SSD drives are sensible to the number of writes it may quickly drain the life from your new SSD drive. And of course after disabling you get some more free space on your drive. Here is how to do it on Windows 7.

Disable System Restore

System Restore is helpful if you mess up your system – for example installing wrong device driver. However, this feature consumes significant amount of free space on your SSD drive. If you are suffering from free space problems and you are confident that changes you make to your system are safe you can disable System Restore.

28 April 2010

Migrating ASP.NET MVC 1.0 to MVC 2.0: Real World Scenario

As most of you have noticed, ASP.NET MVC v.2.0 has been released last month. The new version introduces lots of cool features, so most of the existing MVC 1 applications will be upgraded to the new release. In the current post I will try to share my experience with migrating existing ASP.NET MVC 1.0 application to MVC 2.0.

Scenario: There is an existing ASP.NET MVC 1.0 web application build on top of .NET Framework 3.5, jQuery and Visual Studio 2008. The goal is to migrate the application to MVC 2, while keeping the other libraries and tools (.NET 3.5, VS2008, etc).

Identifying the breaking changes

The first step from the process would be to check the ASP.NET MVC 2.0 breaking changes. Naturally after carefully evaluating each item in the breaking changes list, I have find out that the following will be a problem: “JsonResult now responds only to HTTP POST requests”. The problem was caused by a jQuery plug-in that uses only HTTP GET. So the solution was to:

  • Replace the plug-in by someone more configurable that can use HTTP POST. You should do it in case that your application exposes sensitive information and is vulnerable to the attack described here.
  • Explicitly allow HTTP GET on JsonResults. You can do it by using the JsonRequestBehavior.AllowGet
[AcceptVerbs(HttpVerbs.Get)]
public JsonResult GetData()
{
//Some other code
return Json(data, JsonRequestBehavior.AllowGet);
}


I was lucky that the information exposed in my application was not sensitive, so I decided to use the JsonRequestBehavior.AllowGet.


Migrating the solution to build against ASP.NET MVC 2.0


Being confident that I have resolved all breaking changes I had to think about migrating the solution to use the new version of MVC 2.0. If you don’t want to do everything by hand, you should use this tool. The tool is build by one of the Microsoft employees and works GREAT. However, I have noticed a few gotchas. The tool insists to backup your project before the conversion. This seems redundant, because usually the source code stays in code repository and if somehow the conversion produces a mess, everything could be restored. After all I had to wait a few extra minutes for the backup (more than 1GB in my case). The second issue that I have found is the update of the jQuery files. The tool updates the jQuery and Microsoft AJAX libraries. Since the web site was relying on several other 3rd party jQuery plug-ins I didn’t want the jQuery upgrade. So I had to manually remove the update. Despite of the above, the tool is absolutely FANTASTIC an you will need it.


Running the application


Up to now, everything went pretty well and the solution compiled without problems. So I was ready to run it. After hitting F5 I was stunned. The application started to close and open pages by itself! With the help of a few unit tests and Goolge I was able to identify the source of the problem. It turns out that there is another undocumented breaking change: a value from TempData dictionary will be removed after the request in which it is read! You can read more here. The fix was relatively easy and soon everything was working as usual.


Bottom line


The migration process from ASP.NET MVC 1.0 to MVC 2.0 is relatively easy and you should do it. The new features are awesome.